
Introduction to Sketching Seascapes
Sketching seascapes is a wonderful way to capture the beauty and power of the ocean. Whether you’re a seasoned artist or a beginner, there’s something incredibly rewarding about creating your own interpretation of the sea. In this article, we will explore the allure of the ocean, why sketching seascapes can be so fulfilling, and the basics of seascape art.
-
- The allure of the ocean
The ocean has always held a special allure for artists. Its vastness, its ever-changing moods, and its sheer power make it a captivating subject. The sea can be calm and serene one moment, and wild and tempestuous the next. This unpredictability, coupled with its natural beauty, makes it a fascinating subject for sketching.
-
- Why sketch seascapes?
Sketching seascapes is not just about creating beautiful art. It’s also a way to connect with nature and to express your own emotions and experiences. When you sketch the sea, you’re not just capturing a scene – you’re also capturing a moment in time, a feeling, a memory. It’s a deeply personal and rewarding process.
-
- Understanding the basics of seascape art
Like any form of art, seascape sketching has its own set of rules and techniques. Understanding these basics can help you create more realistic and compelling sketches. Some of the key elements to consider include perspective, light and shadow, and the movement of the water. But remember, art is also about breaking rules and finding your own style, so don’t be afraid to experiment and make the seascape your own.
In the following sections, we will delve deeper into the art of seascape sketching, exploring its history, sharing inspiring examples, and providing practical exercises to help you hone your skills. So grab your sketchbook and let’s embark on this exciting journey together!
Capturing Ocean Scenes: The Basics
Sketching the ocean can be a rewarding experience, allowing you to capture the beauty and majesty of the sea. But before you dive in, it’s important to understand the basics. Here we’ll explore the fundamental techniques for sketching ocean scenes.
Understanding Ocean Sketch Techniques
There are three key steps to mastering ocean sketch techniques: observing the ocean, choosing your materials, and setting up your workspace.
-
- Observing the ocean
Before you start sketching, take some time to observe the ocean. Notice the way the waves move, how the light reflects off the water, and the colors you see. This observation will help you capture the essence of the sea in your sketches.
-
- Choosing your materials
When it comes to sketching, the right materials can make all the difference. For ocean scenes, you’ll want to choose materials that can capture the fluidity and texture of the water. This might include soft pencils for sketching, watercolor paints for adding color, and high-quality paper that can handle the paint.
-
- Setting up your workspace
Finally, setting up your workspace is crucial. You’ll want a comfortable place to sit, plenty of light, and all your materials within easy reach. This will allow you to focus on your sketch without any distractions.
By following these steps, you can start to develop your own unique style of ocean sketching. Remember, the most important thing is to enjoy the process and let your creativity flow.
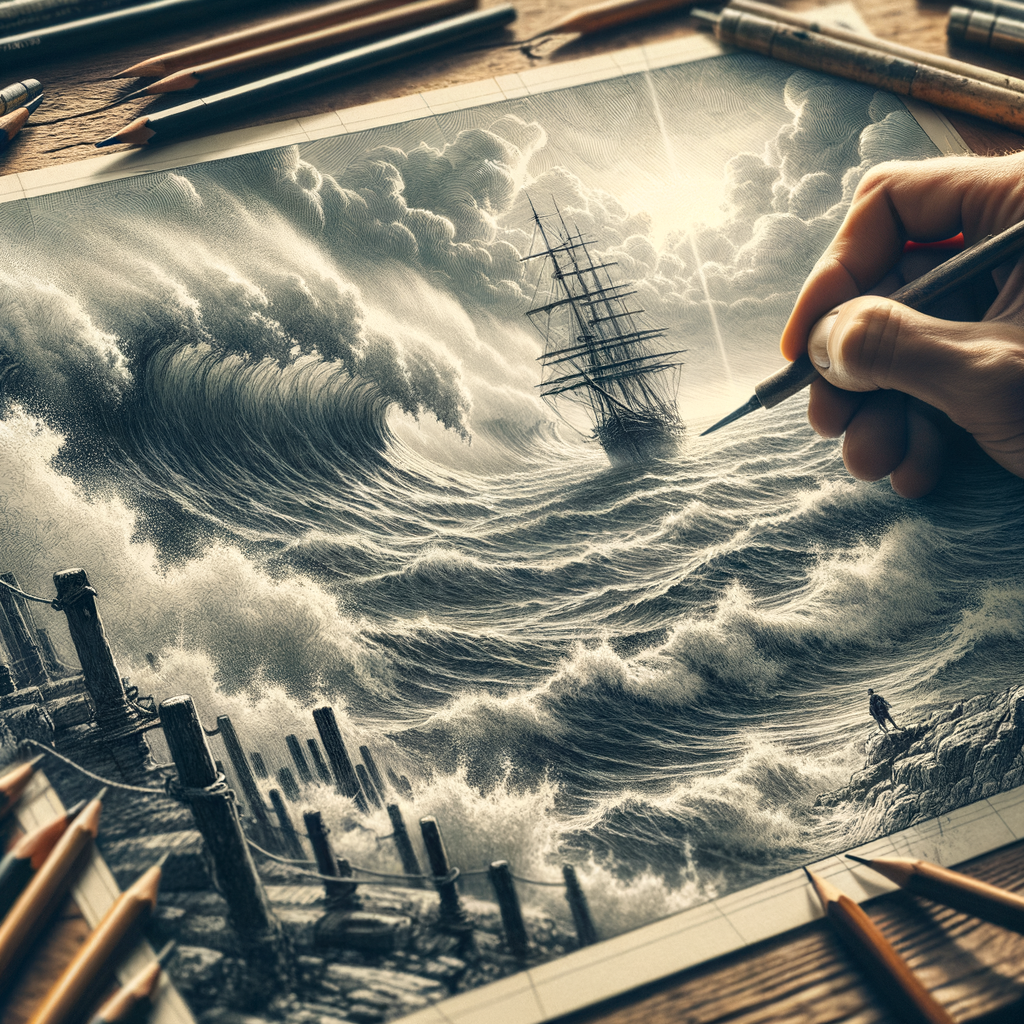
Sketching Ocean Waves: A Step-by-Step Guide
Sketching ocean waves can be a fun and rewarding experience. With a few simple steps, you can create a beautiful seascape that captures the power and beauty of the ocean. Let’s explore how to do this.
-
- Starting with Basic Shapes
Every great sketch starts with basic shapes. For ocean waves, think of curves and lines. Start by drawing a horizontal line to represent the horizon. Then, add a curved line for the crest of the wave. Remember, waves aren’t perfect. They can be tall and narrow or wide and low. Experiment with different shapes until you find what works best for your sketch.
-
- Adding Details and Textures
Once you have your basic shapes, it’s time to add details and textures. This is where your wave comes to life. Use shading to show the darker areas of the wave, and lighter strokes for the areas where the sun hits the water. You can also add lines to represent the foam and spray of the wave. Don’t forget to add some details to the sky and the water behind the wave to give your sketch context.
-
- Creating Depth and Movement
The final step in sketching ocean waves is to create depth and movement. This can be achieved by varying your line weight and using shading. Darker areas will appear closer, while lighter areas will seem further away. To create movement, use curved lines to show the direction of the wave. Remember, waves are never static. They are always moving and changing, so try to capture this in your sketch.
Sketching ocean waves doesn’t have to be complicated. By starting with basic shapes, adding details and textures, and creating depth and movement, you can create a beautiful seascape that captures the essence of the ocean. Remember, practice makes perfect. So, keep sketching and experimenting with different techniques. Happy sketching!
Seascapes in Art: A Historical Perspective
Seascapes have always been a captivating subject in the world of art. The sea, with its vastness and ever-changing moods, has inspired artists throughout history. Let’s take a journey through time and explore how seascapes have been portrayed in different periods of art history.
-
- Seascapes in Ancient Art
The sea has been a subject of fascination since ancient times. In ancient Greek and Roman art, seascapes were often depicted as part of larger scenes, such as battles or myths. For instance, the Greeks often portrayed the sea as a powerful and unpredictable force, reflecting their respect and fear of it. The Romans, on the other hand, focused more on the sea’s tranquility and bounty, often depicting fishing scenes or peaceful coastal landscapes.
-
- The Romantic Period and the Sea
Fast forward to the Romantic period, and the sea took on a whole new significance. Artists like J.M.W. Turner and Caspar David Friedrich used seascapes to evoke intense emotions. Turner’s seascapes, for example, often depicted dramatic scenes of shipwrecks and storms, reflecting the Romantic fascination with nature’s power and unpredictability. Friedrich, on the other hand, used the sea to evoke a sense of sublime awe, often portraying lone figures contemplating the vastness of the ocean.
-
- Modern Interpretations of the Sea
In the modern era, artists have continued to find inspiration in the sea, but their interpretations have become more varied and abstract. Artists like Wassily Kandinsky and Mark Rothko have used the sea as a starting point for abstract compositions, focusing on color and form rather than literal representation. Meanwhile, contemporary artists like Zaria Forman and Alexis Rockman use seascapes to explore environmental themes, highlighting the beauty of the sea while also drawing attention to the threats it faces due to climate change and pollution.
The sea has been a constant source of inspiration for artists throughout history, from the ancient Greeks and Romans to the Romantics and modern artists. Each period has brought its own unique perspective to the depiction of seascapes, reflecting changing attitudes towards the sea and the wider world. As we continue to face environmental challenges, the sea will undoubtedly continue to inspire artists, reminding us of its beauty, power, and vulnerability.
Beauty of the Sea Sketches: Inspiration and Techniques
When it comes to sketching seascapes, there’s a wealth of inspiration to be found in the works of famous artists. Let’s explore some of the most iconic sea sketches and the techniques that brought them to life.
Case Study: Famous Seascape Artists
Three artists, in particular, have made a significant impact on seascape art. Their unique styles and techniques have inspired countless artists and continue to captivate audiences today.
-
Turner’s Tumultuous Seas
Joseph Mallord William Turner, an English romantic painter, is known for his dramatic and atmospheric seascapes. His works, like “The Slave Ship,” capture the sea’s power and tumultuous nature. Turner’s technique involved using vibrant colors and loose brushwork to create a sense of movement and chaos.
-
Hokusai’s Wave
Katsushika Hokusai, a Japanese ukiyo-e painter, is famous for “The Great Wave off Kanagawa.” This iconic print showcases a towering wave about to crash over three boats. Hokusai’s technique involved using bold lines and a limited color palette to create a striking and dynamic image.
-
Monet’s Impressionistic Coasts
Claude Monet, a founder of French Impressionist painting, often depicted the sea in different lights and weather conditions. His works, like “Impression, Sunrise,” use quick, short brushstrokes to capture the fleeting effects of light and color. Monet’s technique encourages artists to paint ‘en plein air’ to capture the sea’s ever-changing moods.
These artists’ works not only provide a visual feast but also offer valuable lessons in technique and approach. By studying their works, we can gain a deeper understanding of how to capture the sea’s beauty in our sketches.
Key Takeaways for Drawing the Ocean
As we delve deeper into the art of sketching seascapes, there are certain principles that can guide us to create more realistic and captivating drawings. Here are some key takeaways to remember when drawing the ocean:
-
- Observation is key: The first step in drawing the ocean is to observe. Look at the way the waves crash, how the light reflects off the water, and the various shades of blue and green that make up the sea. The more you observe, the better you’ll be able to capture the ocean’s essence in your sketches. As Leonardo da Vinci once said, “Learn how to see. Realize that everything connects to everything else.”
-
- Don’t be afraid of detail: The ocean is a complex entity, full of intricate details. From the frothy whitecaps of the waves to the subtle ripples on the water’s surface, every detail adds to the overall realism of your drawing. Don’t shy away from these details. Instead, embrace them and use them to enhance your sketch. Remember, it’s the little things that make a big difference.
- Embrace movement and fluidity: The ocean is never still. It’s always in motion, always changing. This is one of the things that makes it so beautiful and so challenging to draw. When sketching the ocean, try to capture this sense of movement and fluidity. Use flowing lines and loose strokes to convey the ocean’s dynamic nature. As Vincent Van Gogh said, “There is no blue without yellow and without orange.”
Drawing the ocean is a journey of observation, attention to detail, and embracing the fluidity of the sea. With these key takeaways in mind, you’re well on your way to creating stunning seascape sketches.
Seascape Drawing Tutorials: Practical Exercises
Let’s dive into some hands-on exercises that will help you master the art of seascape sketching. These practical exercises are designed to enhance your skills and understanding of how to capture the beauty of the sea on paper.
Exercise 1: Sketching a Calm Sea
Sketching a calm sea can be a peaceful and rewarding experience. It’s all about capturing the serene beauty of the ocean when it’s at its most tranquil. Here’s a step-by-step guide to help you create your own calm sea sketch.
- Step 1: Start by drawing the horizon line. This is the line where the sea meets the sky. It should be straight and positioned about halfway up your page.
- Step 2: Next, sketch the outline of the sea. The water in a calm sea is relatively flat, so your lines should be mostly horizontal. You can add some gentle curves to suggest small waves or ripples.
- Step 3: Now, it’s time to add some details. You can draw a few distant boats or birds to give your sketch a sense of scale and distance. Remember, these should be quite small and simple.
- Step 4: Finally, add some shading to your sea to give it depth and texture. Use a lighter touch for the areas that are catching the light, and a heavier touch for the darker areas.
Remember, practice makes perfect. Don’t be discouraged if your first few attempts don’t turn out exactly as you’d like. Keep trying, and you’ll see improvement over time.
| Key Points | Details |
|---|---|
| Horizon Line | This is where the sea meets the sky. It should be straight and positioned about halfway up your page. |
| Sea Outline | The water in a calm sea is flat, so your lines should be mostly horizontal. Add some gentle curves for small waves or ripples. |
| Details | Add small, simple shapes for distant boats or birds to give your sketch a sense of scale and distance. |
| Shading | Use a lighter touch for areas that catch the light, and a heavier touch for darker areas to give your sea depth and texture. |
“The sea, once it casts its spell, holds one in its net of wonder forever.” – Jacques Cousteau. Let this quote inspire you as you embark on your journey of sketching stunning seascapes.
Exercise 2: Capturing a Stormy Ocean
Have you ever watched a stormy ocean and felt the raw power of nature? In this exercise, we will attempt to capture that energy on paper. Remember, sketching is about expressing your feelings and impressions, so don’t worry about making your drawing perfect. Let’s dive in!
Materials Needed:
- Pencil
- Eraser
- Sketchbook or drawing paper
- Reference photo of a stormy sea (optional)
Steps:
- Start by lightly sketching the horizon line. This will be your guide as you draw the rest of the scene.
- Next, draw the basic shapes of the waves. Remember, stormy seas are chaotic, so your waves should be too. Don’t be afraid to make them big and dramatic!
- Now, add details to your waves. Show the foam and spray that’s created by the crashing waves. You can also add some darker areas to show the depth of the sea.
- Finally, add the sky. Stormy skies are often full of clouds, so be sure to include them in your drawing. You can also add some lightning or rain if you want to make the scene even more dramatic.
- Once you’re happy with your sketch, go over it with a darker pencil or pen to make your lines stand out. Then, erase any unnecessary lines.
Remember, the key to capturing a stormy ocean is to show the movement and energy of the sea. Don’t be afraid to use bold lines and dramatic shapes. And most importantly, have fun!
| Key Points | Details |
|---|---|
| Horizon Line | It sets the stage for your sketch and helps guide the rest of your drawing. |
| Waves | They should be big and dramatic to show the chaos of a stormy sea. |
| Details | Add foam, spray, and darker areas to show the depth and movement of the sea. |
| Sky | Include clouds, lightning, or rain to make the scene more dramatic. |
“The sea, once it casts its spell, holds one in its net of wonder forever.” – Jacques Yves Cousteau
Exercise 3: Drawing a Sunset Over the Sea
In this exercise, we will learn how to create a beautiful sunset over the sea. This scene is a favorite among artists due to its vibrant colors and calming atmosphere. Let’s dive into the steps.
Materials Needed
- Pencil
- Eraser
- Drawing paper
- Colored pencils or pastels (especially shades of orange, yellow, red, blue, and purple)
Step 1: Sketch the Horizon
Start by drawing a straight line across your paper for the horizon. This line separates the sea from the sky. It should be about one-third up from the bottom of your paper.
Step 2: Draw the Sun
Next, sketch a small circle above the horizon line for the sun. This will be the focal point of your sunset.
Step 3: Sketch the Sea
Below the horizon line, use wavy lines to represent the sea. The waves should be smaller near the horizon and larger as they come closer to the foreground.
Step 4: Add Color
Now comes the fun part – adding color! Start with the sky. Use your yellow and orange pencils to color the area around the sun. Gradually blend in red and purple as you move further from the sun. For the sea, use different shades of blue. Remember to leave some areas white to represent the reflection of the sun on the water.
Step 5: Final Touches
Finally, use your eraser to create highlights where the sun’s rays hit the water. You can also add some birds in the sky or a boat on the sea for extra detail.
| Key Points |
|---|
| 1. The horizon line should be straight and one-third up from the bottom of your paper. |
| 2. The sun is the focal point of your sunset drawing. |
| 3. Use wavy lines to represent the sea. |
| 4. Blend different colors to create a vibrant sunset. |
| 5. Use an eraser to create highlights on the water. |
Practice makes perfect. Don’t be discouraged if your first few attempts don’t turn out as you’d like. Keep trying, and you’ll improve over time. Happy drawing!
Conclusion: The Journey of Sketching Stunning Seascapes
As we sail towards the end of our guide, let’s take a moment to reflect on the journey we’ve embarked on together. We’ve explored the captivating world of seascape sketching, delved into its rich history, and discovered the techniques that can transform a simple sketch into a stunning seascape.
- Recap of the guide
We began our journey with an introduction to sketching seascapes, where we learned about the basics of capturing the beauty of the ocean on paper. We then dived into the historical perspective of seascapes in art, understanding how artists over the centuries have been inspired by the sea. We drew inspiration from the beauty of sea sketches and learned about the techniques used by artists to bring their seascapes to life. Finally, we put our knowledge into practice with practical exercises in our seascape drawing tutorials.
- Continuing your seascape sketching journey
But the journey doesn’t end here. With the skills and knowledge you’ve gained from this guide, you are now equipped to continue your own journey in seascape sketching. Remember, practice is key in art. So, keep sketching, keep exploring, and keep discovering the beauty of the sea through your art. As Vincent Van Gogh once said, “I dream my painting and I paint my dream.” Now, it’s your turn to paint your dreams of the sea.
Thank you for joining us on this journey. We hope you found this guide informative and inspiring. Keep sketching, and may your seascapes always be stunning!