Introduction to Mastering Perspective Drawing
Perspective drawing is a key skill for any artist. It helps create depth and realism in your artwork. Whether you’re drawing landscapes, buildings, or interiors, understanding perspective is crucial.
- Understanding the importance of perspective in art: Perspective helps artists show space and distance. It makes flat drawings look 3D. This is important for making your art look real and believable.
- How mastering perspective can improve your interior drawing techniques: When you draw interiors, perspective helps you show the size and shape of the room. It makes your drawings look more accurate and professional. By mastering perspective, you can create detailed and realistic interior sketches.
Learning perspective drawing can be fun and rewarding. It opens up new possibilities for your art. Let’s explore how you can master this important skill.
Basics of Perspective Drawing
Types of Perspective
Perspective drawing helps artists create depth and space in their work. There are three main types of perspective:
- One-point perspective: This type uses a single vanishing point on the horizon line. It’s great for drawing roads, railway tracks, or buildings viewed straight on. For example, imagine looking down a straight street; all lines seem to meet at one point in the distance.
- Two-point perspective: This type uses two vanishing points. It is often used for drawing corners of buildings or interiors. Think of standing at the corner of a building; the lines of the walls will meet at two different points on the horizon.
- Three-point perspective: This type adds a third vanishing point, usually above or below the horizon line. This is useful for drawing tall buildings from a low or high angle. Imagine looking up at a skyscraper; the lines of the building will converge at a point high above.
| Type of Perspective | Number of Vanishing Points | Common Uses |
|---|---|---|
| One-point perspective | 1 | Roads, railway tracks, straight-on views of buildings |
| Two-point perspective | 2 | Building corners, room interiors |
| Three-point perspective | 3 | Tall buildings viewed from above or below |
Elements of Perspective Drawing
-
Horizon Line
The horizon line is where the sky meets the ground. It’s also known as the eye level. In perspective drawing, it helps you understand where objects sit in space. For example, if you draw a road, the horizon line shows where it seems to disappear into the distance.
-
Vanishing Point
The vanishing point is a spot on the horizon line where parallel lines appear to meet. Imagine standing on a straight road; the sides of the road seem to come together at a point far away. This point helps create depth in your drawing.
-
Convergence Lines
Convergence lines are lines that lead to the vanishing point. They help guide the viewer’s eye into the depth of the drawing. For instance, the edges of a building or a set of train tracks will appear to converge as they move towards the vanishing point.
| Element | Description | Example |
|---|---|---|
| Horizon Line | Where the sky meets the ground; shows eye level. | Skyline in a landscape drawing. |
| Vanishing Point | Point on the horizon where parallel lines meet. | End of a straight road. |
| Convergence Lines | Lines that lead to the vanishing point. | Edges of a building or train tracks. |
Perspective Drawing Tips
- Using a ruler or straight edge
- Practicing with simple shapes
- Adding details gradually
One of the best ways to get clean, straight lines in your perspective drawings is to use a ruler or a straight edge. This tool helps you draw accurate lines that converge at the vanishing points. It makes your drawings look more professional and precise.
Start with basic shapes like cubes, spheres, and cylinders. Drawing these shapes in perspective helps you understand how objects look from different angles. Practice makes perfect, so keep drawing these shapes until you feel comfortable.
Once you have the basic shapes down, start adding details slowly. Begin with the larger details and work your way to the smaller ones. This method helps you build up your drawing without getting overwhelmed.
Drawing Interiors Guide
Planning Your Drawing
-
Choosing a viewpoint:
Start by deciding where you want to view the room from. This is called the viewpoint. It could be from a corner, the center, or any other spot. The viewpoint will affect how the room looks in your drawing.
-
Deciding on the level of detail:
Think about how detailed you want your drawing to be. Do you want to include every piece of furniture and decoration, or just the main shapes? More detail means more time, but it can make your drawing look more realistic.
-
Sketching a rough layout:
Before you start your final drawing, make a rough sketch. This is a simple outline of the room and its main features. It helps you plan where everything will go and makes the final drawing easier.
Applying Perspective
- Using vanishing points effectively
- Drawing objects in scale
- Creating depth and dimension
Vanishing points are essential in perspective drawing. They help create a sense of depth. Imagine looking down a straight road; the sides seem to meet at a point in the distance. This point is the vanishing point. Use it to make your drawings look more realistic.
When drawing, it’s important to keep objects in scale. This means making sure that objects are the right size compared to each other. For example, a chair should not be bigger than a table. Use a ruler or grid to help keep things in proportion.
Depth and dimension make your drawings come to life. To create depth, use shading and overlapping. Shading makes some parts look closer and others farther away. Overlapping means drawing one object in front of another. This shows which object is closer to the viewer.
| Technique | Purpose |
|---|---|
| Vanishing Points | Create depth |
| Scale | Keep objects in proportion |
| Depth and Dimension | Make drawings realistic |
Interior Design Sketching
Drawing Room Interiors
-
Understanding room proportions:
Room proportions are key to a good sketch. Start by measuring the room. Note the height, width, and length. This helps you draw the room accurately. Use a ruler to keep lines straight.
-
Adding furniture and decor:
Furniture and decor bring life to your sketch. Begin with the largest pieces like sofas or beds. Then, add smaller items like lamps and tables. Make sure to place them in the right spots.
-
Creating texture and lighting effects:
Texture and lighting make your sketch look real. Use shading to show where light hits. Draw lines and patterns to show different textures, like wood or fabric.
| Key Aspect | Details |
|---|---|
| Room Proportions | Measure height, width, and length. Use a ruler for straight lines. |
| Furniture and Decor | Start with large pieces. Add smaller items in the right spots. |
| Texture and Lighting | Use shading for light effects. Draw patterns for textures. |
Sketching Interiors: Case Studies
-
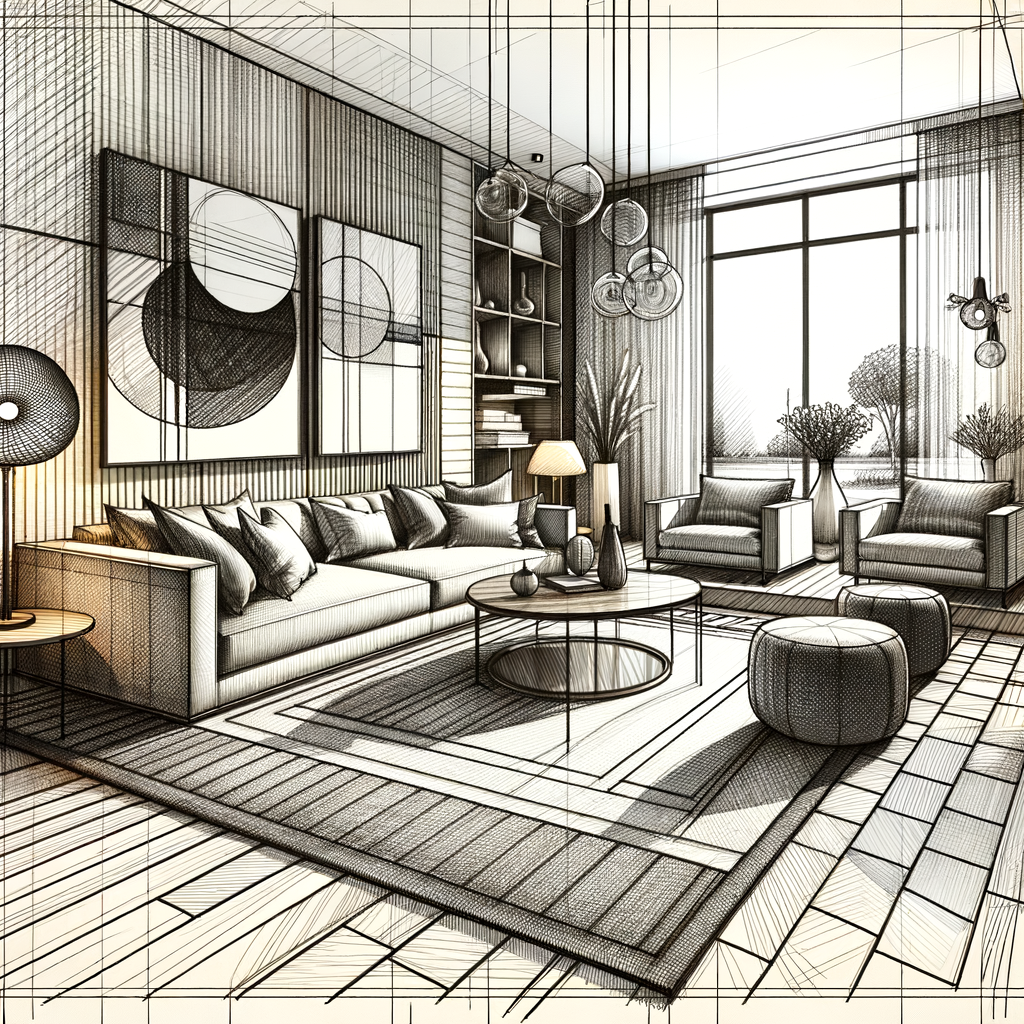
Case Study 1: Residential Living Room
In this case study, we will explore a cozy residential living room. The key to sketching this space is understanding its proportions and the placement of furniture.
Key Insights:
- Proportions: The room’s dimensions are 20 feet by 15 feet. The ceiling height is 10 feet.
- Furniture: The room includes a sofa, coffee table, and a TV stand. The sofa is positioned against the longest wall.
- Lighting: Natural light enters through a large window on one side. There are also two floor lamps.
When sketching, start with the room’s outline. Add the large pieces of furniture first. Then, include smaller details like lamps and decor items.
-
Case Study 2: Commercial Office Space
This case study focuses on a modern commercial office space. The office is designed to be functional and stylish.
Key Insights:
- Proportions: The office measures 30 feet by 25 feet with a ceiling height of 12 feet.
- Furniture: Includes desks, chairs, and storage units. Desks are arranged in a grid pattern.
- Lighting: Overhead fluorescent lights provide ample lighting. There are also large windows for natural light.
Begin your sketch by outlining the room. Next, add the desks and chairs. Finally, include details like computers and office supplies.
-
Case Study 3: Modern Kitchen
Our final case study is a sleek, modern kitchen. This space combines functionality with contemporary design.
Key Insights:
- Proportions: The kitchen is 15 feet by 12 feet with a ceiling height of 9 feet.
- Furniture: Features include a kitchen island, cabinets, and appliances. The island is centrally located.
- Lighting: Recessed lighting and under-cabinet lights provide a bright workspace.
Start sketching by outlining the kitchen’s layout. Add the island and major appliances. Finish by sketching cabinets and lighting fixtures.
Drawing Architectural Interiors
-
Understanding Architectural Styles
Architectural styles are like the personality of a building. They tell us about the time period and culture. For example, Gothic style has pointed arches and tall windows. Modern style uses clean lines and open spaces. Knowing these styles helps you draw interiors that look real.
Style Key Features Gothic Pointed arches, tall windows Modern Clean lines, open spaces Baroque Ornate details, grand scale -
Using Architectural Drawing Techniques
Architectural drawing techniques help you create accurate and detailed drawings. One important technique is using a ruler to draw straight lines. Another is using perspective to show depth. For example, objects closer to you appear larger, while those farther away look smaller. This makes your drawings look 3D.
Here are some key techniques:
- Ruler: For straight lines
- Perspective: To show depth
- Shading: To show light and shadow
-
Adding Architectural Details
Details make your drawings come to life. Think about things like windows, doors, and furniture. These details help people understand the space. For example, adding a couch and a coffee table can show that a room is a living room. Small details like light fixtures and wall art add even more realism.
Remember to:
- Include furniture: Like couches and tables
- Add fixtures: Like lights and fans
- Show decor: Like paintings and plants
Conclusion: The Art of Interior Perspective Drawing
As we wrap up our journey into the world of interior perspective drawing, let’s take a moment to reflect on what we’ve learned and how you can continue to grow as an artist.
- Recap of key takeaways:
- Understanding Perspective: We started by learning the basics of perspective drawing. This includes the importance of vanishing points and horizon lines.
- Drawing Techniques: We explored various tips and tricks to make your drawings more realistic. This includes using light and shadow effectively.
- Interior Design Sketching: We delved into the specifics of drawing interiors. This involves paying attention to details like furniture, textures, and spatial relationships.
- Architectural Interiors: We also touched on the importance of accuracy and scale when drawing architectural interiors.
- Continuing your drawing journey:
- Practice Regularly: The key to mastering perspective drawing is consistent practice. Set aside time each day to draw.
- Study Real-Life Examples: Look at real interiors and try to sketch them. This will help you understand how objects relate to each other in space.
- Seek Feedback: Share your drawings with others and ask for constructive criticism. This can help you improve.
- Keep Learning: There are many resources available, such as books and online tutorials. Keep expanding your knowledge and skills.
| Key Concept | Description |
|---|---|
| Vanishing Points | Points where parallel lines appear to converge in a drawing. |
| Horizon Line | The level at which the sky meets the ground in a drawing. |
| Light and Shadow | Techniques used to add depth and realism to drawings. |
| Scale | The relative size of objects in a drawing. |
Remember, the art of interior perspective drawing is a journey. Keep practicing, stay curious, and enjoy the process. As the famous artist Vincent Van Gogh once said, “Great things are done by a series of small things brought together.”