Introduction to Stippling Art
Stippling art, a unique and fascinating form of creating images, has a rich history and significant importance in the world of art. This introductory section will provide you with a clear understanding of stippling, its history, and why it holds a special place in the art world.
-
- Definition of Stippling
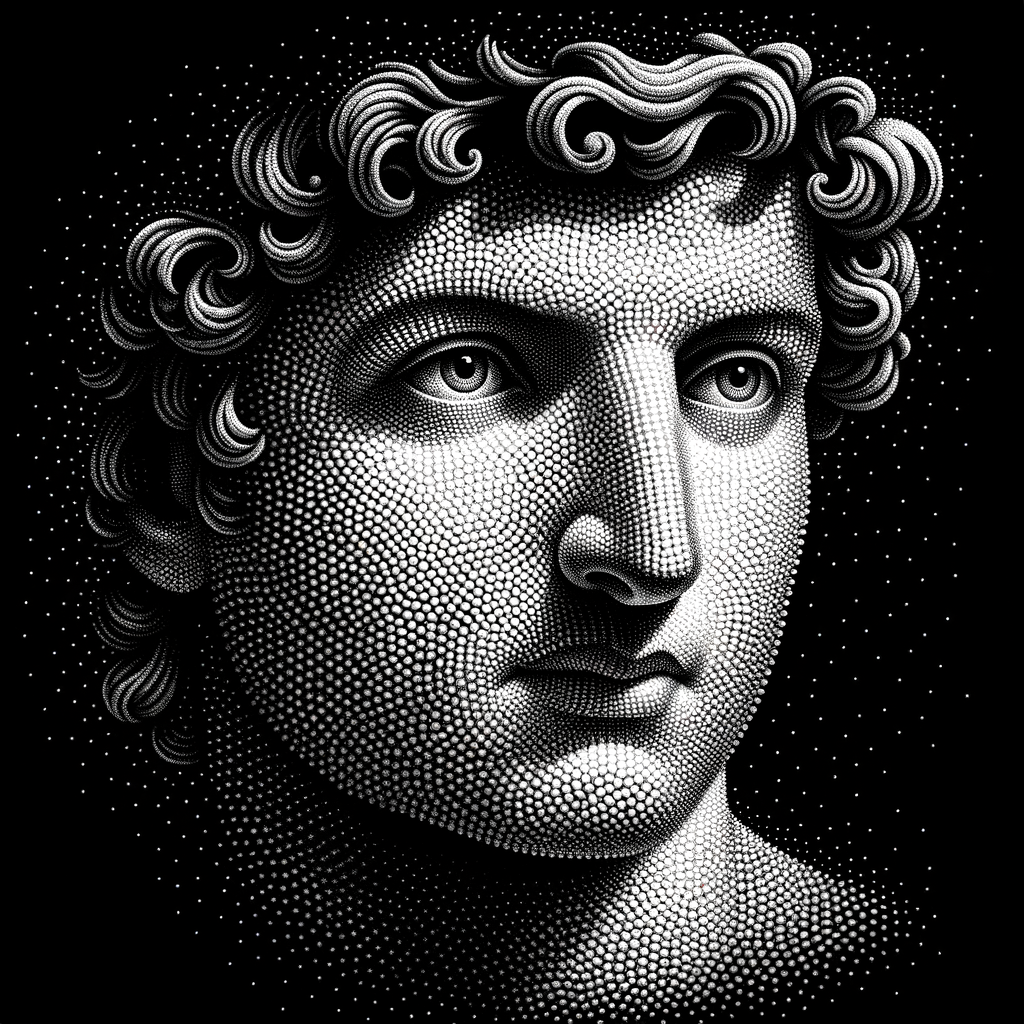
Stippling is an artistic technique used to create patterns and shading in drawings or paintings. It involves making numerous small dots or specks to form an image. The density of these dots determines the light and dark areas of the artwork, creating depth and dimension. This technique can be used with various mediums, including ink, paint, and even digital art tools.
-
- History of Stippling Technique in Drawing
The stippling technique has a long and interesting history. It originated in the 1500s as a method of printmaking. Artists would carve tiny dots into a plate, which was then covered in ink and pressed onto paper to create an image. Over time, artists began to use stippling in their drawings and paintings, appreciating the unique textures and depth it could provide. Famous artists like Rembrandt and Van Gogh have used stippling in their works, contributing to its popularity and evolution.
-
- Importance of Stippling in Art
Stippling is more than just a technique; it’s a way for artists to express themselves uniquely. The patience and precision required for stippling allow artists to create intricate details and subtle shading that can’t be achieved with other techniques. It’s a method that encourages mindfulness and focus, as each dot contributes to the overall image. Moreover, stippling can be used in various art forms, from traditional drawing and painting to digital art, making it a versatile and valuable skill for any artist.
In the following sections, we will delve deeper into the basics of stippling, advanced techniques, and ways to improve your stippling skills. Whether you’re a beginner or an experienced artist, there’s always something new to learn about the beautiful world of stippling art.
Understanding the Basics of Stippling
Stippling is a unique form of art that involves creating images using dots. This technique can create an impressive level of detail and depth, making it a popular choice for many artists. Let’s delve into the basics of stippling and learn how to create art with dots.
Creating Art with Dots
Creating art with dots, also known as dot art or pointillism, is a fascinating process. It involves using tiny dots to form an image or pattern. The beauty of this art form lies in its simplicity and the ability to create complex images with just dots. Let’s explore the concept and techniques of dot art.
-
- Concept of Dot Art
Dot art is a technique that involves using dots to create images or patterns. Each dot acts as a building block of the image. The size, color, and placement of the dots can greatly affect the overall appearance of the artwork. This art form requires patience and precision, but the end result is often stunning and worth the effort.
-
- Techniques for Creating Dot Art
Creating dot art involves a few key techniques. First, you need to decide on the image or pattern you want to create. Then, you start by placing dots on the canvas, starting from one corner and working your way across. The density of the dots can create different shades and depth in the image. Lighter areas are created with fewer dots, while darker areas have more densely packed dots. It’s important to practice this technique to get a feel for how the dots can shape the image.
It requires patience and precision, but the end result is a detailed and beautiful piece of artwork. Whether you’re an experienced artist or a beginner, stippling is a technique worth exploring.
Artistic Use of Dashes
Just as dots can create a beautiful piece of stippling art, dashes too have their unique place in the art world. Let’s delve into the world of dash art and explore its intricacies.
- Understanding Dash Art
Unlike dot art, dash art involves the use of short, straight lines or ‘dashes’ to create an image or pattern. These dashes can be of varying lengths and thicknesses, and they can be arranged in any direction. This gives the artist a lot of flexibility and allows them to create a wide range of textures and effects. For instance, closely spaced, thin dashes can create a smooth, soft effect, while widely spaced, thick dashes can create a rough, textured effect.
- Methods for Creating Dash Art
Creating dash art requires patience and precision, much like stippling. Here are some steps to get you started:
- Choose your tools: You can create dash art with any medium that allows you to make distinct lines. This includes pens, pencils, markers, and even digital tools.
- Plan your image: Before you start making dashes, it’s a good idea to sketch out your image lightly with a pencil. This will serve as a guide as you add your dashes.
- Start dashing: Begin adding dashes to your image. Remember, the direction, length, and spacing of your dashes will affect the final look of your art.
- Build up layers: You can create depth and texture in your dash art by building up layers of dashes. This can be achieved by going over the same area multiple times with dashes in different directions.
Remember, practice makes perfect. The more you experiment with dash art, the better you’ll get at controlling the effects you can create with your dashes.
Advanced Stippling Techniques
Stippling is an art form that requires patience and precision. As we delve into advanced techniques, we will explore the unique method of combining dots and dashes to create intricate designs.
Mastering Dot and Dash Art
Dot and dash art is a fascinating aspect of stippling. It involves the strategic placement of dots and dashes to form patterns and images. Let’s explore how to combine these elements and examine some examples of this art form.
-
- Combining Dots and Dashes in Art
Combining dots and dashes in stippling art is a technique that can add depth and texture to your work. Dots are used to create areas of light and shadow, while dashes can be used to outline shapes and add detail. The key is to practice controlling the pressure of your pen or pencil to create dots and dashes of different sizes and densities. This will give your artwork a sense of depth and dimension.
-
- Examples of Dot and Dash Art
Dot and dash art can be seen in various forms of artwork, from intricate portraits to detailed landscapes. For instance, an artist might use dots to create the illusion of a sky filled with stars, while dashes could be used to outline the silhouette of a mountain range. The beauty of this technique lies in its versatility and the endless possibilities it offers to artists.
Mastering dot and dash art requires practice and patience. However, the results can be truly stunning, making it a worthwhile technique for any aspiring stippling artist to learn.
Stippling Art Creation
Creating stippling art can be a rewarding experience. It requires patience, precision, and the right materials. Let’s explore the steps involved in creating a stippling artwork and the materials you’ll need.
- Steps for Creating a Stippling ArtworkCreating a stippling artwork involves a series of steps. Here’s a simple guide to help you get started:
- Choose Your Subject: Start by deciding what you want to draw. It could be anything from a simple object to a complex landscape.
- Sketch Your Outline: Use a pencil to lightly sketch the outline of your subject on your paper.
- Start Stippling: Using your stippling pen, start making small dots within your outline. Remember, the closer the dots, the darker the area will appear.
- Build Up Your Dots: Gradually add more dots to create depth and texture. This process requires patience, but the end result is worth it!
- Finalize Your Artwork: Once you’re satisfied with your stippling, you can erase any remaining pencil lines. Congratulations, you’ve created your first stippling artwork!
- Materials Needed for StipplingStippling requires a few basic materials. Here’s what you’ll need:
- Stippling Pen: This is a special type of pen that’s perfect for creating small, precise dots.
- Paper: Any type of paper will do, but thicker paper is often better as it can handle the pressure of the stippling pen without tearing.
- Pencil and Eraser: You’ll need these to sketch your initial outline and erase any mistakes.
- Patience: Stippling is a time-consuming process, but the end result is a beautiful, detailed piece of art.
Improving Your Stippling Skills
Stippling, a form of dot art, is a unique and engaging art technique. The key to mastering stippling is consistent practice and learning from the best. Here are some ways to enhance your stippling skills.
Practicing Dot Art Techniques
Dot art, also known as pointillism, involves creating images with small dots. The more you practice, the better you become. Here are some exercises and case studies to help you improve.
-
- Exercises for Dot Art
Start with simple shapes like circles, squares, and triangles. Draw these shapes using dots only. Gradually, move on to complex objects like flowers, animals, and landscapes. Remember, the closer the dots, the darker the area appears. The farther apart, the lighter it appears.
-
- Case Studies of Dot Art
Studying the works of renowned dot artists can provide valuable insights. For instance, the works of Georges Seurat, a pioneer of pointillism, can be a great starting point. Analyze how he used dots to create depth and texture. Try to replicate some of his simpler works to understand his techniques better.
Improving your stippling skills is a journey of exploration and consistent practice. With patience and perseverance, you can create stunning dot art pieces. Remember, every dot contributes to the bigger picture, just like every step you take brings you closer to your goal.
Enhancing Dash Art Techniques
As we continue our journey in the world of stippling art, let’s now focus on another exciting technique – Dash Art. Dash Art is a form of stippling where dashes, rather than dots, are used to create images and patterns. It requires a different set of skills and practices, but with the right approach, you can master it and create stunning artworks.
-
- Practices for Dash Art
Improving your Dash Art skills involves a lot of practice and patience. Here are some practices that can help you enhance your technique:
-
-
- Consistent Dashes: The key to successful Dash Art is consistency. Try to keep your dashes the same length and thickness. This will give your artwork a more uniform and professional look.
- Direction of Dashes: The direction of your dashes can dramatically change the appearance of your artwork. Experiment with different directions to create various textures and effects.
- Spacing: The space between your dashes can create different shades and depths. Closer dashes will appear darker, while more spaced-out dashes will appear lighter.
- Examples of Successful Dash Art
-
Let’s take a look at some examples of successful Dash Art to inspire you and give you a better understanding of what you can achieve with this technique.
| Artist | Artwork | Technique |
|---|---|---|
| Paul Klee | “Forest Witches” | Paul Klee’s artwork is a perfect example of how to use dashes to create depth and texture. He used varying lengths and directions of dashes to create a mystical forest scene. |
| Vincent Van Gogh | “Starry Night” | Van Gogh’s Starry Night is not only a masterpiece of dash art but also a lesson in the use of color and spacing. The dashes in the sky create a swirling effect, while the dashes in the buildings create a sense of solidity. |
Remember, the key to mastering any art form is practice and patience. So, don’t be discouraged if your first few attempts at Dash Art don’t turn out as you expected. Keep practicing, learn from your mistakes, and you’ll soon see improvement. Happy stippling!
Creating Stippling Drawings
Creating stippling drawings is an exciting journey. It requires careful planning and the right materials. Let’s delve into how you can plan your stippling artwork effectively.
Planning Your Stippling Artwork
Before you start your stippling drawing, there are two key steps you need to take: choosing the right subject and preparing your art materials.
-
- Choosing the Right Subject for Stippling
Choosing the right subject is crucial in stippling art. The subject should have a good range of tones, from light to dark, to showcase the beauty of stippling. Subjects with interesting textures, like animals or landscapes, often make for compelling stippling drawings. Remember, the more detailed the subject, the more time and patience it will require. So, choose a subject that you are passionate about and willing to spend time on.
-
- Preparing Your Art Materials
Once you’ve chosen your subject, it’s time to prepare your art materials. You’ll need a good quality drawing paper, a pen with a fine point, and a pencil for sketching your subject before you start stippling. The paper should be thick enough to withstand the pressure of stippling without tearing. The pen should have a fine point to create small, precise dots. A pencil is useful for sketching your subject before you start stippling, which can help guide your work and prevent mistakes.
Planning your stippling artwork is an essential step in the process. By choosing the right subject and preparing your art materials, you can set yourself up for success and create a beautiful piece of art.
Executing Your Stippling Artwork
Now that we’ve planned our artwork, it’s time to bring our vision to life. This section will guide you through the process of creating a stippling artwork and highlight key takeaways to ensure you create a masterpiece.
-
- Step-by-Step Guide to Creating a Stippling Artwork
Creating a stippling artwork requires patience and precision. Here is a simple guide to help you through the process:
| Step | Description |
|---|---|
| 1 | Start with a light sketch of your subject on the paper. This will serve as a guide for your stippling. |
| 2 | Begin stippling. Start from a corner and work your way across the image. Remember, the closer the dots, the darker the area will appear. |
| 3 | Take regular breaks. Stippling can be tiring for your hand, so it’s important to rest. |
| 4 | Once you’ve finished stippling, step back and review your work. Make any necessary adjustments. |
-
- Key Takeaways in Creating Stippling Drawings
Here are some important points to remember when creating stippling drawings:
-
- Patience is key: Stippling is a time-consuming process. Don’t rush it. Take your time to place each dot carefully.
- Consistency is important: Try to keep your dots consistent in size and spacing. This will give your artwork a more professional look.
- Practice makes perfect: Don’t be discouraged if your first few attempts don’t turn out as you’d hoped. Keep practicing and you’ll improve over time.
Remember, the beauty of stippling art lies in its simplicity. It’s all about creating an image using nothing but dots. So, take a deep breath, pick up your pen, and start stippling!
Conclusion: The Beauty of Stippling Art
As we reach the end of our exploration into the world of stippling art, it’s clear to see that this technique holds a unique beauty. The intricate patterns and depth created by simple dots is truly astounding. Let’s summarize our journey and look forward to our continued practice in this art form.
-
- Appreciating the Complexity of Stippling
Stippling art may seem simple at first glance, but as we’ve learned, it’s a complex process that requires patience and precision. Each dot plays a crucial role in the overall image, and the artist must carefully consider where to place it. The complexity of stippling art is what makes it so fascinating. It’s a testament to the artist’s skill and dedication, turning thousands of tiny dots into a cohesive, stunning image.
-
- Encouragement for Continued Practice
Like any art form, mastering stippling takes time and practice. But don’t be discouraged if your first few attempts don’t turn out as you’d hoped. Remember, every artist starts somewhere. With each dot you place, you’re improving your skills and getting one step closer to creating your masterpiece. So, keep practicing, keep exploring, and most importantly, keep enjoying the process. The beauty of stippling art lies not just in the final product, but in the journey of creating it.
Remember, stippling art is a beautiful and complex art form that offers endless possibilities for creativity. Whether you’re a seasoned artist looking to try something new, or a beginner just starting your artistic journey, stippling art is a wonderful technique to explore. So pick up your pen, start dotting, and discover the beauty of stippling art for yourself.