
Introduction to Drawing Realistic Eyes
- Understanding the importance of mastering realistic eye art
- Overview of the techniques for drawing realistic eyes
Drawing realistic eyes is a crucial skill for any artist. Eyes are often called the “windows to the soul” because they show emotions and bring portraits to life. Mastering this skill can make your drawings look more lifelike and engaging.
There are several techniques to help you draw realistic eyes. These include understanding the eye’s anatomy, using proper shading techniques, and paying attention to details like reflections and eyelashes. By learning these methods, you can improve your art and create stunning, realistic eyes.
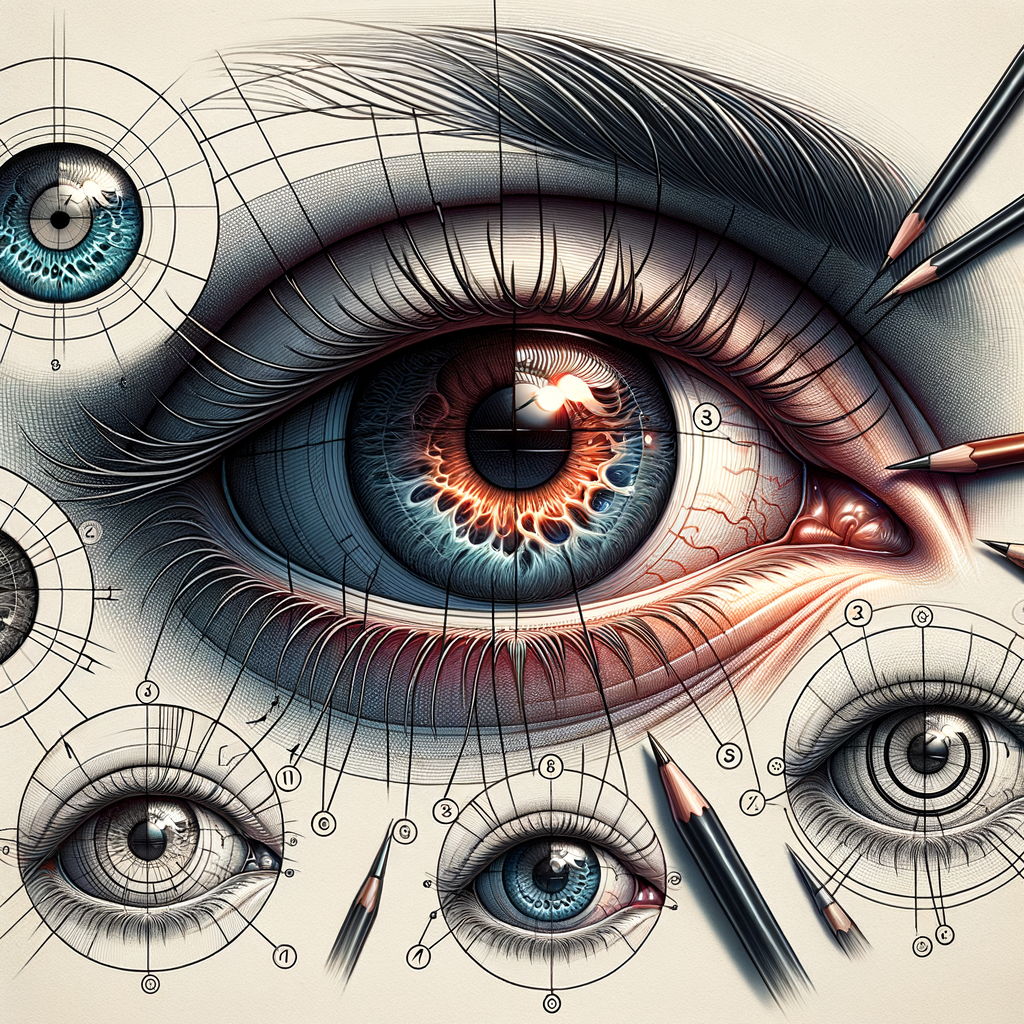
Understanding the Anatomy of the Eye
To draw realistic eyes, it’s important to know the different parts of the eye. Each part has a unique role in how the eye looks.
- Identifying key parts of the eye
- Iris: The colored part of the eye.
- Pupil: The black center of the eye that changes size.
- Sclera: The white part of the eye.
- Cornea: The clear layer covering the iris and pupil.
- Eyelid: The skin that covers and protects the eye.
- Eyelashes: The small hairs on the edge of the eyelid.
- Tear Duct: The small opening in the corner of the eye.
- Understanding how different parts contribute to the overall appearance
- Iris: Gives the eye its color and adds depth.
- Pupil: Changes size to control light, making the eye look alive.
- Sclera: Provides contrast to the iris and pupil.
- Cornea: Adds shine and reflects light.
- Eyelid: Shapes the eye and shows expression.
- Eyelashes: Frame the eye and add detail.
- Tear Duct: Adds realism and shows moisture.
Knowing these parts helps you draw eyes that look real and full of life. Each part plays a role in making the eye look natural and expressive.
| Part of the Eye | Function |
|---|---|
| Iris | Gives color and depth |
| Pupil | Controls light entry |
| Sclera | Provides contrast |
| Cornea | Adds shine and reflection |
| Eyelid | Shapes and shows expression |
| Eyelashes | Frames and adds detail |
| Tear Duct | Adds realism and moisture |
Techniques for Drawing Realistic Eyes
Realistic Eye Drawing Tips
- Using the right materials: To draw realistic eyes, start with good quality pencils and paper. Use a range of pencils from hard (H) to soft (B). This helps in creating different shades and textures. Good erasers are also important for refining details.
- Understanding light and shadow: Light and shadow play a big role in making eyes look real. Notice where the light hits the eye and where the shadows fall. This will give your drawing depth and make it look three-dimensional.
- Practicing different eye shapes and sizes: Eyes come in many shapes and sizes. Practice drawing different types of eyes to improve your skills. This will help you draw more realistic and varied eyes in your artwork.
Detailed Eye Drawing Methods
-
Sketching the Basic Shape
Start by drawing a simple oval shape. This will be the outline of the eye. Make sure it is not too round or too flat. Think of it as an almond shape.
Next, draw a horizontal line through the middle of the oval. This helps to place the iris and pupil correctly.
-
Adding Details to the Iris and Pupil
Draw a circle inside the oval to represent the iris. The iris should touch the top and bottom of the oval.
In the center of the iris, draw a smaller circle for the pupil. The pupil should be perfectly round and centered.
To make the eye look more realistic, add small lines radiating from the pupil to the edge of the iris. These lines mimic the natural texture of the iris.
-
Creating Realistic Eyelashes and Eyebrows
Draw the upper and lower eyelids by adding curved lines above and below the oval. These lines should follow the shape of the eye.
For the eyelashes, draw short, curved lines along the edge of the upper and lower eyelids. Make sure the eyelashes are thicker at the base and taper off at the tip.
To draw the eyebrows, use short, quick strokes to create a natural, hair-like texture. The eyebrows should follow the natural curve of the brow bone.
-
Adding Shadows and Highlights
Shading is key to making the eye look three-dimensional. Add shadows to the upper part of the iris and around the edges of the eye.
Use a light touch to add highlights to the pupil and the lower part of the iris. This gives the eye a shiny, wet look.
Don’t forget to add shadows under the eyelashes and eyebrows to enhance depth and realism.
How to Draw Realistic Eyes Step by Step
-
Starting with a Basic Sketch
Begin by drawing a simple outline of the eye. Use light, soft lines. Draw an oval shape for the eye and a circle inside for the iris. Don’t forget to add a smaller circle for the pupil. This is your basic sketch.
-
Adding Details Gradually
Next, add more details to your sketch. Draw the eyelids around the oval shape. Add the eyelashes, making sure they curve naturally. Include the tear duct at the inner corner of the eye. These details make the eye look more realistic.
-
Using Shading Techniques for Depth
Shading is key to making your eye drawing look real. Start by shading the iris. Use darker shades near the pupil and lighter shades as you move outward. Shade the white part of the eye lightly to show shadows. Don’t forget to shade the eyelids and the area around the eye for depth.
-
Finalizing with Highlights and Finishing Touches
Finally, add highlights to your drawing. Use a white pencil or eraser to create small, bright spots on the iris and pupil. These highlights make the eye look shiny and alive. Review your drawing and add any final touches to enhance realism.
Realistic Eye Shading Techniques
- Understanding the Role of Light in Shading
Light plays a big role in shading. It helps to show where the eye is round and where it is flat. When you draw, think about where the light comes from. This will help you know where to make parts of the eye lighter or darker.
For example, if the light is coming from above, the top of the eye will be lighter. The bottom will be darker. This makes the eye look more real.
- Using Different Pencil Grades for Different Effects
Pencils come in different grades. Some are very soft, and some are very hard. Soft pencils make dark marks. Hard pencils make light marks. You can use both to make your drawing look real.
For example, use a soft pencil to make the pupil very dark. Use a hard pencil to make light lines around the eye. This helps to show different textures and details.
- Blending Techniques for Smooth Transitions
Blending is important for shading. It helps to make smooth transitions between light and dark areas. You can use tools like a blending stump or even your finger.
For example, after shading with a pencil, gently rub the area with a blending tool. This will make the shading look smooth and natural. It helps to remove harsh lines and makes the eye look more lifelike.
| Technique | Purpose | Example |
|---|---|---|
| Understanding Light | Shows where to shade | Light from above makes the top of the eye lighter |
| Different Pencil Grades | Creates texture and detail | Soft pencil for dark pupil, hard pencil for light lines |
| Blending | Makes smooth transitions | Use a blending tool to smooth out shading |
Drawing Lifelike Eyes
Mastering Realistic Eye Art
Drawing lifelike eyes can be challenging, but with practice and the right techniques, you can master it. Here are some key tips to help you improve your eye drawings:
- Practicing regularly: The more you draw, the better you get. Set aside time each day to practice drawing eyes. Start with simple sketches and gradually add more details.
- Studying from real life and photographs: Observe real eyes closely. Look at the shapes, shadows, and reflections. Use photographs as references to understand different eye shapes and expressions.
- Continually refining your techniques: Always look for ways to improve. Try different shading methods, experiment with light and shadow, and learn from other artists. Keep refining your techniques to make your drawings more realistic.
Remember, drawing lifelike eyes takes time and patience. Keep practicing, studying, and refining your skills, and you will see improvement.
Conclusion: The Art of Drawing Realistic Eyes
Drawing realistic eyes is a skill that takes time and practice to master. By understanding the anatomy of the eye and using the right techniques, you can create lifelike drawings that capture the essence of your subject.
- Recap of key techniques and methods:
- Study the anatomy of the eye to understand its structure.
- Use light and shadow to create depth and realism.
- Pay attention to details like eyelashes and reflections.
- Practice shading techniques to add dimension.
- Follow a step-by-step approach to build your drawing.
- Encouragement for continued practice and learning:
Remember, every artist starts as a beginner. Keep practicing and don’t be afraid to make mistakes. Each drawing is a step towards improvement. Keep learning new techniques and experimenting with different styles. Your dedication will pay off, and soon you’ll be drawing realistic eyes with confidence.
| Key Point | Details |
|---|---|
| Anatomy | Understand the structure of the eye. |
| Light and Shadow | Use shading to create depth. |
| Details | Focus on eyelashes and reflections. |
| Practice | Keep drawing and learning. |
As you continue your journey in drawing, remember this quote by Leonardo da Vinci: “Art is never finished, only abandoned.” Keep refining your skills, and enjoy the process of creating art.